In this tutorial you will learn how to animate a quadrupedal cycle, in particular a horse as they are one of the most common animals to be animated. A horse can move in several different ways from walking, ambling or trotting but we're going to look at the gallop; it's fastest form of movement, allowing us to make full use of it's muscles and limbs. This tutorial is intended for beginners with a basic knowledge of Maya and the animation principles.
16.3.11
15.3.11
Getting Started
The first thing is to find some real horse galloping reference and Eadweard Muybridge is a good place to start. Below is a page from his book Animals in Motion and it'll provide the key poses for our animation.

Now you'll need to find a rig. I found a pretty decent free rig which I'll be using in this tutorial, but of course you can use your own.

Modeled by Tim Mayo
Rigged by Christopher Carson
Downloaded at Creative Crash
14.3.11
Setting up the Scene
With Muybridge's images for reference and a downloaded rig, we can begin. Firstly open up Maya and create a new project file and put the horse rig into the scene folder. Now open the scene and bring out the Preferences window inthe bottom right corner.

Under Settings set the Time to "PAL (25fps)". And under Animation, select "Flat" for both in and out tangents. This will give a nice ease-in and ease-out. In the Timeslider section set the Playback to "Play every frame" and "Real-time (25fps)" and click save.
Now turn on Autokey by clicking the key icon next to preferences inthe bottom right hand corner. It should now be red. This tool will make our lives easier, as Maya will now automatically keyframe any changes.
13.3.11
Starting to Animate
In our Muybridge reference there are 16 poses, so set the whole animation to 16 frames.


In the side view, key frame the first pose concentrating on just the legs by translating and rotating the ankle controls and rotating the hoof controls. You don't need to be perfect but just to get a basic idea of the poses, as we'll be tweaking parts as we go along.

The first and last frames need to be the same to create a cycle, so select all the controls on frame 1, and with the middle mouse button click on frame 16 and press "S". This allows us to keep the pose the same whilst moving along the timeslider.
12.3.11
Blocking out the Poses

Now we just need to continue posing out each frame according to the Muybridge image, and remember to concentrate on just the legs.

Your key frames should look something like this, and notice that in some of the frames the legs aren't straight enough or need to be stretched out further but this can be altered later on.
11.3.11
Shoulders
After key-framing the legs we work our way up to the shoulders. They need to be furthest out when the legs are extended out to their maximum. Let's start with the right shoulder.

Start at frame 1 and select the shoulder control. Rotate X forward slightly to about 15units and Translate Z back to around -0.5. Notice the leg is slightly bent now, but we want it to be completely straight, so select the ankle control again and move it back until it's fully straight but still touching the ground.

Your first frame should look something like this. When we rotate the shoulders it allows the legs to stretch out much further giving more extreme poses. With the first frame done, shift select the shoulder and ankle control and middle mouse click on the last frame and press "S" because again, the first and last frames must be the exact same. So any changes to the first frame, you need to remember to do the same for the last.

With the first shoulder key frame done we need to find the next frame where the shoulders would be furthest rotated and translated, which I think would be frame 8 as this is where the leg is highest and just about to kick out and down. So we'll do the opposite of what we did for frame 1, by rotating X back and translating Z forward a little.
Now we need to repeat the same process for the left shoulder, first scrubbing through the frames to see where the leg is furthest forward and back.
 So for the left shoulder, at frame 5 the leg reaches it's maximum height so we can Rotate X back and Translate Z forward, only slightly like for the right shoulder as we want the shoulders to look natural.
 And at frame 13, where the leg is stretching back do the opposite as before, of Rotating X forward and Translating Z back. As this gallop is an asymmetric cycle, the leg positions won't be the exact same on the right to the left so there's no need to worry about having the same units for both legs. Making each leg move slightly differently to each other will make it look less mechanical and give a much more realistic feel to the run.
Now we need to repeat the same process for the left shoulder, first scrubbing through the frames to see where the leg is furthest forward and back.


10.3.11
Hind Legs

We also need to do the same with the back legs, but they can be much more exaggerated than the front as they're more flexible and use more power to push off the ground. Again we'll need to scrub through the frames and judge where the legs is furthest forward, which I think is frame 6 for the right leg. Start by selecting the "rt_rearLeg_CTRL" and Rotate X back to about -30, and Translate Z forward slightly.

And frame 12 where the legs are kicking out, Rotate X forward so the leg is higher and Translate Z back so they are further out.


The left back leg kicks out again at Frame 11 just before the right leg falls back down, so Rotate X forward and Translate Z back, again no need to worry about exact units.
9.3.11
Centre of Gravity
After completing the leg movements, we need to animate it's centre of gravity which is essentially the up and down movement of the whole horse.

Frame 2 is where all the legs are in the air and curled together the tightest, which leads onto Frame 3 where they start to spread out to land, so to demonstrate some overlap we'll keyframe the centre of gravity at it's highest at Frame 3. Do this by selecting the "ct_COG_CTRL" and Translate Y by 0.5.

At Frame 9 when the leg has landed with all it's weight pushing down just before leaving the ground again, Translate Y down to about -0.2. Notice that before the left front leg wasn't fully planted on the ground properly but now it is because we adjusted the centre of gravity.
Here's a quick playblast of what the gallop should look like at this point. It's still very jittery but now we have the main poses laid out ready for smoothing and refining.
8.3.11
Graph Editor
We've got the main 16 poses framed but now we need to cycle it so no matter how long the animation is, it'll still be moving. Start by selecting all of the rig's controls and open out the Graph Editor. Then go to View and check "Infinity".

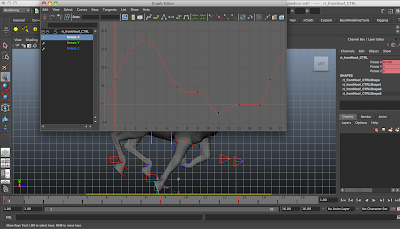
For now, the graph will look something like this where there is a flat linear line before and after the animation. To achieve a cycle go to Curves > Pre Infinity > Cycle. Then Curves > Post Infinity > Cycle.

Your graph should look like this, where the keys are repeated before it's first frame and after it's last. This is why we needed the first and last frames to be the exact same, so there is a smooth transition when cycling. After, go to View and check "Show Buffer Curves" this is another useful tool which displays the original shape of the curve after we edit them.
Cleaning up the Curves
Lets start with the front right leg. Select the ankle control and open up the Grapth Editor then select the first curve, Translate Y onthe side and press "F" to frame. We'll edit each curve one by one, starting with Translate Y.

Select the first and last keys, and press "W" to be in the Move Tool then middle mouse click and move the keys up a little. We're doing this to try and create a smooth transition for a natural looking cycle. You can also select the handles to smooth out the curve, but make sure to select both handles of the first and last keys.

With the first and last keys done, we can start cleaning up the rest of the curve. Start by deleting any keys that aren't needed as they don't have much of an effect when they're not there. Do this by testing each point by deleting them and seeing the effect, if they're needed just undo and carry onto the next. After getting rid of unnecessary keys select the keys that are left and use their handles to start smoothing them out. At Frame 15 the foot should be planted, so highlight the key and edit it's value to 0.


 Again, smooth the first and last keys, then delete any unneeded keys. You should constantly be scrubbing through the animation and flicking back to the graph editor refining each pose.
 Other things you should look out for when cleaning up your curves are flat linear lines with multiple keys. They all have the same value so you can delete all unnecessary keys in between the first and last points before it changes.
If you select a key and go to Curve > Weighted Tangents then go to Keys > Free tangent weight, this frees the key allowing for more influencing. After you have finished cleaning up the curves for the right leg, repeat the process for the rest of the legs aswel.

With the Translate Y curve of the right ankle cleaned up we can start cleaning up the Rotate X and Translate Z curves, as they are the only ones with keyframes. Repeat the same process as before of cleaning the first and last frames, then deleting unnecessary keys and smoothing out the rest of the curve.

Once finished with the right front ankle, start working on it's hoof control. It'll be quicker as we only need to clean it's Rotate X curve.


For example, at Frame 11 the foot should be planted, so select the key and press "W" and middle mouse click, dragging the key down until it's touching the ground as shown above.

If you select a key and go to Curve > Weighted Tangents then go to Keys > Free tangent weight, this frees the key allowing for more influencing. After you have finished cleaning up the curves for the right leg, repeat the process for the rest of the legs aswel.
7.3.11
Cleaning up the Centre of Gravity
The horse is quite a large animal so it'll be pretty heavy and to emphasise this we can edit the centre of gravity's curve by letting it pause onthe ground for longer before quickly pushing up into the air and then quickly falling back down again.

Start by shifting Frame 1 and 16 up above the axis and edit their tangents so the curve is smoother. We want the horse to stay on the ground for longer than when it's up inthe air.

One way to achieve this is to flatten the tangent at Frame 10, where the centre of gravity is at it's lowest. A flat and horizontal tangent gives a slower ease in and ease out, letting the horse stay low to the ground for longer. And when it's in the air the peaks are much smaller showing the horse rising and falling quickly, not holding the pose for too long.
Side to Side Movement
When we walk we don't extend our legs in a direct straight line which is also relevant for a horse especially when it's running, the side to side movement becomes more prominent.

When the foot is planted Translate X the ankle control towards the body and when the leg is bent up close towards it's body, key at 0. However, when the foot is planted Translate X shouldn't move so the curve should be completely flat as shown above. Do so for all limbs then smooth out their curves.
Tweaking the Foot
We've almost finished animating the legs now, but to emphasise on the weight of the horse especially when it lands and pushes down on the ground, select the ankle control and notice the "Compress Fetlock" option. For each leg you'll need to scrub through the poses and judge which frames the foot is fully planted on the floor.

For example, for the right hind leg they're planted from Frame 8 to 10. At Frame 8 key the "Compress Fetlock" at 0 as the hoof has just begun to touch the floor and theres no pressure on it yet, then at Frame 10 bring it up to 10, which is the maximum compression as it's just before the hoof is about to leave the ground so all of the horse's weight is squashing it's muscles around the hoof. After keying we need to alter the curve. From Frame 8 to 10 the compression will be increasing steadily so a straight increasing line shown above is fine, but as soon as it hits the maximum and about to kick off, it'll drastically fall and go back to 0 so a steep and decelerating curve . Now you'll need to repeat this process for the other legs, but it'll be at different frames depending on when the foot is planted.
6.3.11
Cleaning up the Hind Legs
In the gallop the horse kicks up and out into the air very quickly as it's travelling very fast. To achieve this we'll need to edit the curves of the ankle control's Translate X and Translate Z.

Steepen the curve when the leg is lifting, as the steeper the curve the faster the movement. Then when it's highest in the air start flattening the curve so it'll hold it's pose for a short while, then when it's legs start to fall down steepen the cuve again but in the opposite direction. Your graph editor should look something like the above. Repeat this for the other legs, but not to worry if they're not the exact same as they shouldn't be.
And here's a play blast of what the gallop cycle should look like so far. The legs now move much more smoother than before.
And here's a play blast of what the gallop cycle should look like so far. The legs now move much more smoother than before.
Hips
We're going to animate the hips now to loosen the gallop up as it looks extremely stiff at the moment. Notice the double-ended arrow controls on top of the horse's body. Select the rear end one called "ct_rearTorso_CTRL".

To make things simple we're only going to just animate the Rotate X. At Frame15 Rotate X forward to about 9, as here all it's weight is being supported by the one hoof onthe ground so the hips need to lean forward for balance. Then at Frame 6 Rotate X back to -8, as here it's being supported by it's back left leg so it needs to lean back a little.

At Frame 12, both back legs are stretching high out in the air and the horse is being supported by it's front left leg. We'll need to rotate the hips forward to about 15, this will raise the legs higher and let the hips lean closer to the supporting hoof.

After framing te key poses, we'll once again clean up the curve. Start by shifting Frame1 and Frame 16 up above the axis. We can probably delete Frame as it isn't needed now.

After we've adjusted the tangents your curve should look something like this, where the hips rotate forward slightly faster than rotating back.
5.3.11
Front Torso

We've finished animating the hips and now need to move onto the front torso, doing the same of rotating in the X axis. We won't rotate it as much as the hips, but instead do subtle movements as we'll be able animate the neck muscles with more exaggeration. Start at Frame 1 by Rotating X forward a little to about 2.8 as here the horse is pushing forward, copy this to Frame 16 as they need to be identical.

Then at Frame 6 rotate the torso backwards so it's head is in an upright position balancing the weight onto the right back leg. And then back at Frame 12, Rotate X forward to about 5.5 as here it's leaning forward the most with it's legs stretching out.
 Again back in the graph editor we smooth out the curves so they transition nicely between each key. Notice that the curves generally increase faster than decreasing, as I like to think the horse uses more force and energy pushing up of the ground before relaxing slightly when falling back down.

4.3.11
Neck

From the torso we move up to the neck. Here we can exaggerate the neck movement but still keeping it natural by allowing the neck to rotate forward much more than back. With this in mind, at Frame 5 where the horse is in an almost upright position, Rotate X to about -3.5. Then at Frame 10 increase the rotation to about 6. Notice that we didn't key the neck on the same frames as the torso, as we don't want them to be moving in unison but to show some overlap. After keying go to the graph editor and again smooth out the curve.
3.3.11
Head
Finishing of with the upper body movement we move onto the head, which will be rotating the most. It could be described as a chain reaction where the torso starts moving, causing the next link to move, which in this case is the neck, which in turns causes the head to move. The further along the chain we go, the more we see it significantly move.

Starting at Frame 7 select "ct_head_CTRL" and Rotate X to about 12 units, as this is where the horse is landing on it’s hind legs so the head rolls forward for balance.

Then at Frame 14 rotate it back to about -12 so the head is up when the horse is leaning out on the front right leg.

The final part is to clean up the curves. Select Frame 1 and 16 and translate them down closer towards Frame 14 and again select the handles adjust the tangents. Here the curve is almost symmetrical identifying that the head is moving up and down at a steady rate.
2.3.11
Ears
Starting from the legs and working our way up, we've finally made our way to the ears. To make our lives easier we need only to animate the right ear and then copy the frames onto the left ear.

So lets start with selecting the "rt_earlow_CTRL" and at Frame 3 when the horse is completely hovering in the air, Rotate X the ears so they're almost vertical. This will depend on the angle of your horse's head.

And at Frame 12, when the horse has landed and the head is at it's lowest near to the ground, rotate the ear back even further to about 70. As the horse is travelling fast, the wind pushes the ears back.

In the graph editor shift Frame 12 up a little to around 60, as we don't want the ears to be too exaggerated. Then smooth out Frame 3 so it creates a pointed curve as shown. This means the ears will be pulled back for longer and flick forward quickly.

After we've finished animating the right ear, select all of it's keys in the graph editor and copy them. Now select the "lf_earLow_CTRL" and in it's Rotate X right click and open up the "Paste Keys Option" menu. Make sure your settings are the same as shown above, specifically the "Paste Method" set at "Replace" and "Replace Region" at "Entire Curve". Check the "Connect" box too.

Delete the left ear's last Frame 16 and paste the right ear's cuve onto the left ear. It should automatically connect to the first frame and be similar to the above.
Now we've completed animating the horse's upper body and here's a play blast of what you should have achieved.
1.3.11
Conclusion
Here is the final render of what your horse gallop should look like if you followed this tutorial. Of course it's not perfect but it's a start and you can always tweak parts to personalize it to your own needs. With the animation done and dusted, go ahead and slap on some colour, maybe a tail and even an environment and let your horse run wild.
Subscribe to:
Comments (Atom)